Welcome Kit
We are so glad you're here!
Welcome to Paper Trails!
Thank you for entrusting us with your business’ payroll, human resource and compliance needs. We have put together this welcome page to ensure that your transition to Paper Trails is as seamless as possible. On this page, you will find quick tutorial videos on some of the basic aspects of the isolved platform, as well as key deadlines, important resources and much more.
Taking the time to review the information on this page will set up your business for long term success with Paper Trails by your side. Should you have any questions about any of the following information, feel free to contact your processor and they will be happy to help!
What You Need to Know
Payroll Deadlines

Payroll Processing Cutoff Time:
The deadline for submitting payroll is 12pm EST three business days prior to pay day. For example, payroll must be submitted no later than noon on Tuesday for Friday pay day. Payrolls submitted after this deadline will be pushed to the next business day.
Payroll Debit:
Paper Trails will debit the full amount of your payroll, including all wages and taxes, from your business checking account one business day before pay day. For example, if your pay day is Friday, funds will be withdrawn from your account on Thursday morning. When you submit payroll to us, please ensure that funds are available in your account to avoid bounce fees and employee direct deposit issues!
Payroll Funding Option:
We understand that managing cash flow can be challenging for small businesses. That’s why we integrate with Payro, a payroll funding option that provides instant access to funds whenever you need them. Key benefits include:
- Instant Access: Get the funding you need without delay.
- High Approval Rates: Most businesses are approved quickly.
- Same-Day Funding: Access up to $500,000 in payroll funds.
- No Impact on Credit: Applying does not affect your credit score.

The most rewarding way you can help yourself have a great experience with Paper Trails is to make an investment in educating yourself on how to best utilize isolved. We have great online training in the isolved University.
The University has great 10-15 minute classes on every aspect of the system. In addition to classes, there are help articles with step-by-step instructions on how to perform the tasks you want.
There are 2 ways to access the University:
- Once you have your isolved login, click your name in the top left corner > click “University” > You may need to sign up the first time; each subsequent time you log in you will not need your login.
- Visit https://learning.myisolved.com and sign in.
Here are some quick isolved tutorial videos that we have put together for you!

Step-by-Step Instructions
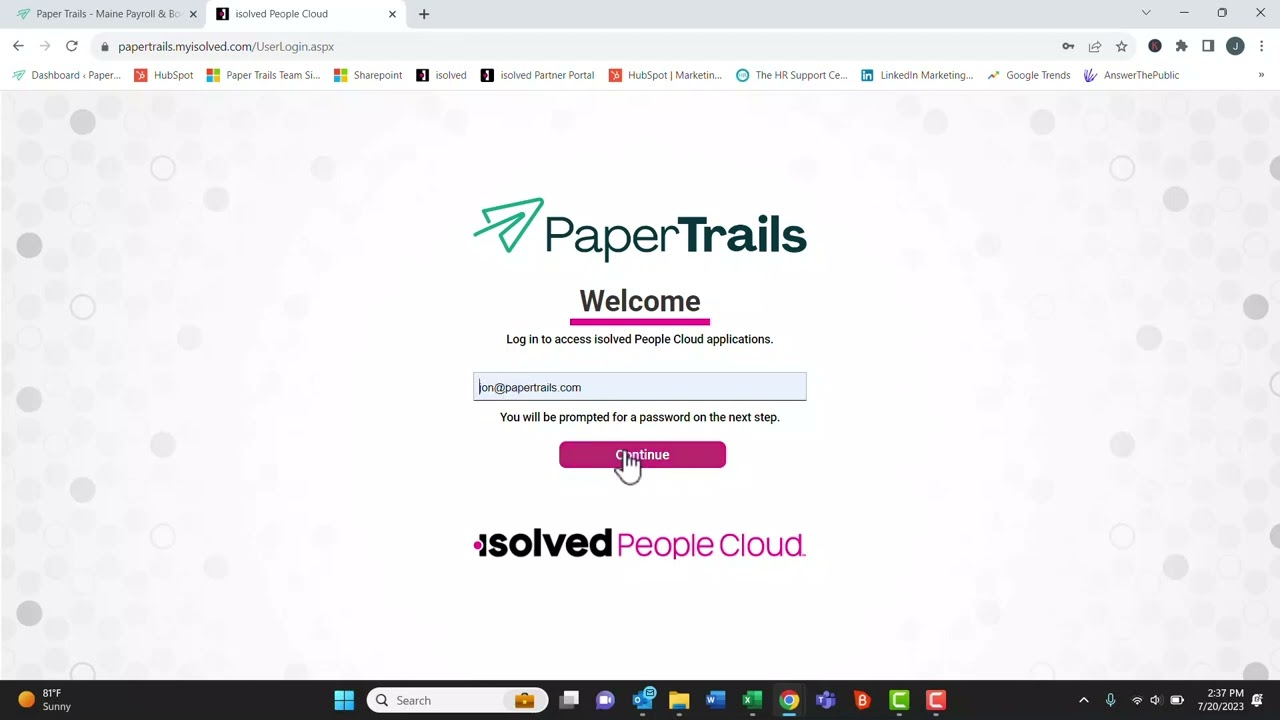
To log in to isolved, visit papertrails.com.
- Click the log in button in the top right.
- In the box that appears, click the isolved under the Employers tab.
- Sign in with your username (your email address) and password.
- Choose the correct user type (if applicable).
And that’s it! You’re in!
Step-by-Step Instructions
Some basic navigation methods in isolved include:
- Once logged into the system you’ll see your name in the top left corner in hot pink. When you click on the drop-down arrow you’ll see, Home / My Account / University / Logout.
- Click on the University and create your login, this will be the same username and password you created for papertrails@myisloved portal. The university is an invaluable tool and we strongly encourage our clients to participate in the training they offer, this will assist in navigating the system and if we are unavailable help to answer questions you may have.
- The Main Menu is on the left in Black and White, you should see Employee Management / Employee Admin Tools / Employee Self-Service /Payroll Processing / Reporting.
- At the very top of the page there is a large black band then a bit below that is another black band, this is your task bar.
Below is a brief description of each category listed under Employee Management.
- Employee Summary:
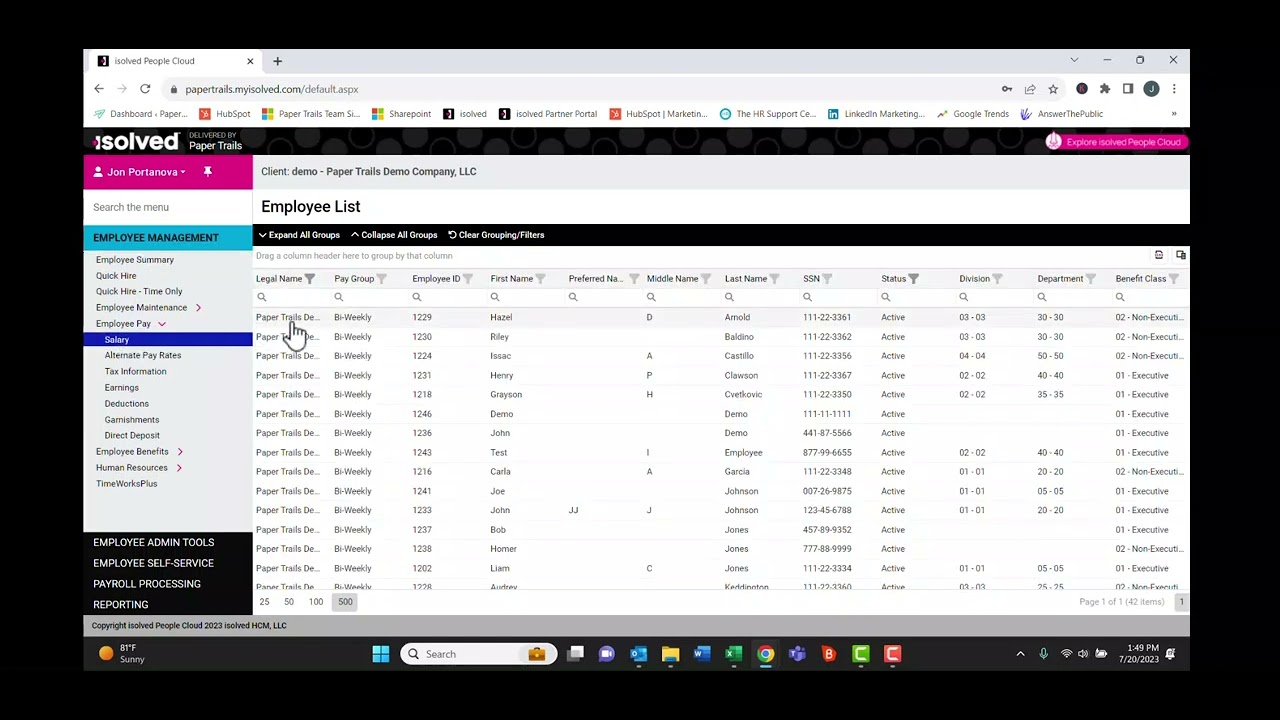
- This is a list of all active employees. To see all employees including terminated, go to the status header and click on the funnel shape, click on Terminated or All, click OK.
- When you click on an employee’s name this will take you to that employee’s summary page. This page shows what we have in the system for the individual employee. When you hover over any of the headers, they will turn blue, when you click it will take you directly to the page where the information is located.
- You can either toggle back and forth through employees by using the arrows at the top of the page near the employee’s name or to get back to the full list click on the 3 lines.
- Quick Hire:
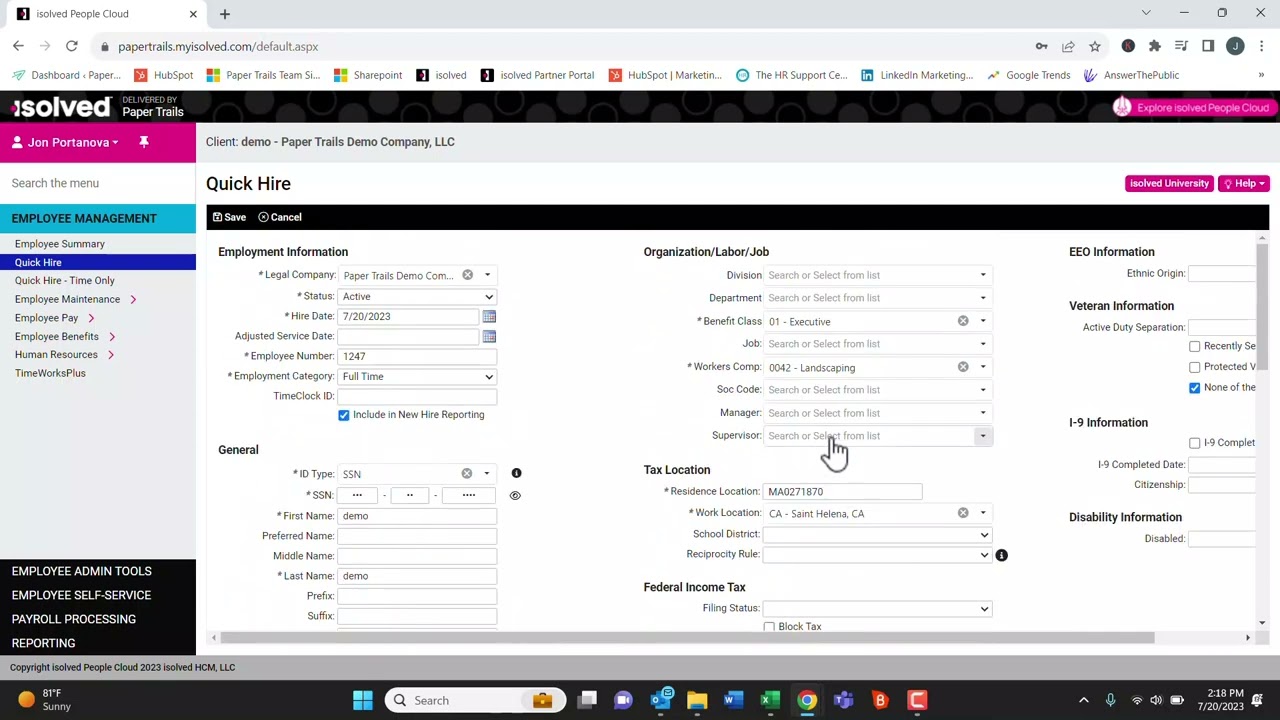
- This is exactly as it says, to enter a new hire using a single page to enter the required information. Anything with an asterisk is a required field and must be completed.
- Employee Maintenance:
- General – Employee’s demographic information.
- Employment – Designation of Full-time or Part-time status.
- Organizations – Assign a department.
- Employee Pay:
- Salary – Update an employee’s rate of pay or salary.
- Alternate Pay Rates – Enter any additional rates of pay the employee may have.
- Tax Information – Employees tax withholding status.
- Earnings – Additional earnings the employee should receive.
- Deductions – Employee deductions per pay period.
- Garnishments – Please send all garnishment paperwork directly to your designated payroll processor to enter. There are several different types of garnishments and all are calculated differently.
- Direct Deposit – Employee’s direct deposit information.
- Employee Benefits:
- Benefits – List of Benefits the employee participates in.
- Leave Accruals – Shows the Employee’s Accrual Balance and Plan Values.
- Accrual Balance History – The accruals use history, accrued, taken and balance.
- Accrual History Updates – Used when an update is needed to an employee’s accrual balance.
- Human Resources
- Company Assets – List of company equipment or property that has been issued to the employee.
- Employee Contacts – emergency contact information and beneficiary information is located.
- Employee Documents – Paperless storage for all employee documents.
- Performance – Store information regarding awards & certificates received. Occurrences that may have taken place and corrective actions that were taken. Create employee reviews, schedule reviews, and see review history. Record training and certifications, along with tracking expiration dates and when renewal is needed.
Employee Self-Service:
- This is what the employee sees when they login to the Employee Environment.
- They can make changes to their tax withholding status, emergency contacts, and direct deposits.
- The employee will login and go to Pay History listed here to access their pay stubs. Pay stubs can be viewed, downloaded, and printed.
- In addition to accessing the employee’s pay stubs they can also retrieve copies of their W2 at year end.
Reporting:
- Report Archive – All payroll reports are located here, each pay period the reports will generate and you can access them here.
- Client Reports – There is a wide variety of reports that can be found here, we suggest if you are looking for a specific type of report contact your designated processor and they can point you in the right direction.
- Return Archive – This is where your payroll tax reports are located by year and by quarter.
- Click on the Year drop down to choose the year, Period for the quarter and then click Filter. After each change of year or quarter you’ll need to click filter to update to the correct documents.
- Year End Report Archive – Copies of all year end documents such as W-2, W-3 and any 1099 forms.
Step-by-Step Instructions
- Login to papertrails@myisolved.com.
- Main Menu / Employee Management / Quick Hire
- All information with an asterisk is a required field.
Employment Information
- Legal Company, Status and Employee Number will auto generate.
- ** Hire Date – be sure to change to the appropriate date of hire. The system will auto generate to the Quick Hire date, this may cause the employee to not show when processing payroll.
- Employment Category – Full Time or Part Time
- TimeClock ID – when using the timekeeping module with one of our timeclocks you’ll need to enter an ID for each employee, enter the last 4 digits of the employee’s SSN.
General
- ID Type – SSN for use when entering the Social Security number in the field just below.
- ** Self-Service Email – Be sure to enter the employee’s email address, this will be needed for the employee to set up access to the Portal where they will get their pay stubs and copies of W-2s at year end.
- ** Be sure to check the box Enable Self-Service Access, this gives them access to register on the Portal.
- When entering the Zip Code, it will auto generate the City.
Salary
- Pay Type – Normally Hourly, Salary or can be at times 1099.
- Be cautious when entering pay information, be sure to enter in the correct box. For Salary employees you can either enter the Annual Salary and it will auto generate the Per Pay Salary and what the Hourly Rate would be. For Hourly Rate, this will do the same and auto generate what the Per Pay Salary would be if working the Normal Hours per pay period and the Annual Salary working the same.
Alternate Pay Rate
- If an employee has multiple rates of pay enter here.
Organization / Labor / Job
- Enter appropriately per employee if this is set up for your account.
Tax Location
- Residence Location – Auto generates when the employee’s address is entered.
- Work Location – Use the drop down to enter.
Federal Income Tax – Enter information from the 2020 Federal W4 Form.
State Income Tax – Enter the information from the State W4 Form.
Direct Deposit
- Status – Enter Active
- Account Type – Enter appropriate type of account, if this is incorrect the Direct Deposit may not go through.
- Sequence – If 100% of the employee’s pay is going into one account choose Remaining Net. (see # 8 for instructions on set up for multiple accounts).
- Frequency – Auto generates to Every Pay.
- Amount & Percent will be greyed out when 100% is going into the one account.
- Routing Number & Account Number – We suggest getting either a voided check or bank note to be certain the information is correct. If the information entered is incorrect the direct deposit will bounce back to Paper Trails, this may take a few days. We are unable to make any corrections to a direct deposit that fails until after the bank notifies us.
- Description
- Enter the Bank Name.
- Multiple Direct Deposit Accounts – When an employee has multiple direct deposit accounts the Sequence box will need to have the number 1, then enter either the amount or percent that should be deposited into that account and complete that row. Click the Add New Tab under the Status box, complete status, and account type if there are more accounts choose 2 enter amount or percent and continue to complete. When there are no other accounts, and the reaming pay is to go into a final account enter Remaining Net and continue.
Go to the Black Task Bar at the top of the page just under Quick Hire and click Save.
Once the employee is saved in the system there is additional information that needs to be entered.
- If you are using our Timekeeping module, you’ll need to add a Policy Group to the new employee.
- Employee Management / Employee Maintenance / Jobs / Click the Pencil Icon on the Right-hand side below the black task bar.
- Other Options on the bottom right.
- Override Policy Group, use the drop down to choose the appropriate Policy Group for that employee.
- Save on the Black Task Bar.
- If a department wasn’t chosen during Quick Hire and one is needed.
- Employee Management / Employee Maintenance / Organizations /
- Use the drop down to choose the appropriate department for the employee.
- Save on the Black Task Bar.
- To assign an Accrual Policy.
- Employee Management / Employee Benefits / Accruals / Leave Accruals
- There may be multiple plans set up, if so go to the plan this employee is eligible for and using the drop down choose the appropriate plan.
- Save on the Black Task Bar.
- Employee Management / Employee Benefits / Accruals / Leave Accruals
Step-by-Step Instructions
- Login to papertrails@myisolved.com
- Navigate to Employee Management > Employee Maintenance > General
- Choose the employee from the employee list.
If the employee has an incorrect email address
- Under Self-Service Information.
- Self-Service Email.
- Uncheck “Enable Self-Service Access”.
- Change the email address.
- Check the Enable Self-Service Access box again.
- Save on Black Task Bar. This will send a new authentication email to the employee to set up access to the employee portal.
If there are problems with self-service access
If an employee had previous access to the portal and is now unable to login.
-
- Confirm the employee is logging into myhrstuff.com.
- They are using their email address as their username.
- If they have forgotten their password, they will need to use the forgot password utility and reset the password. We do not have access to reset an employee’s password.
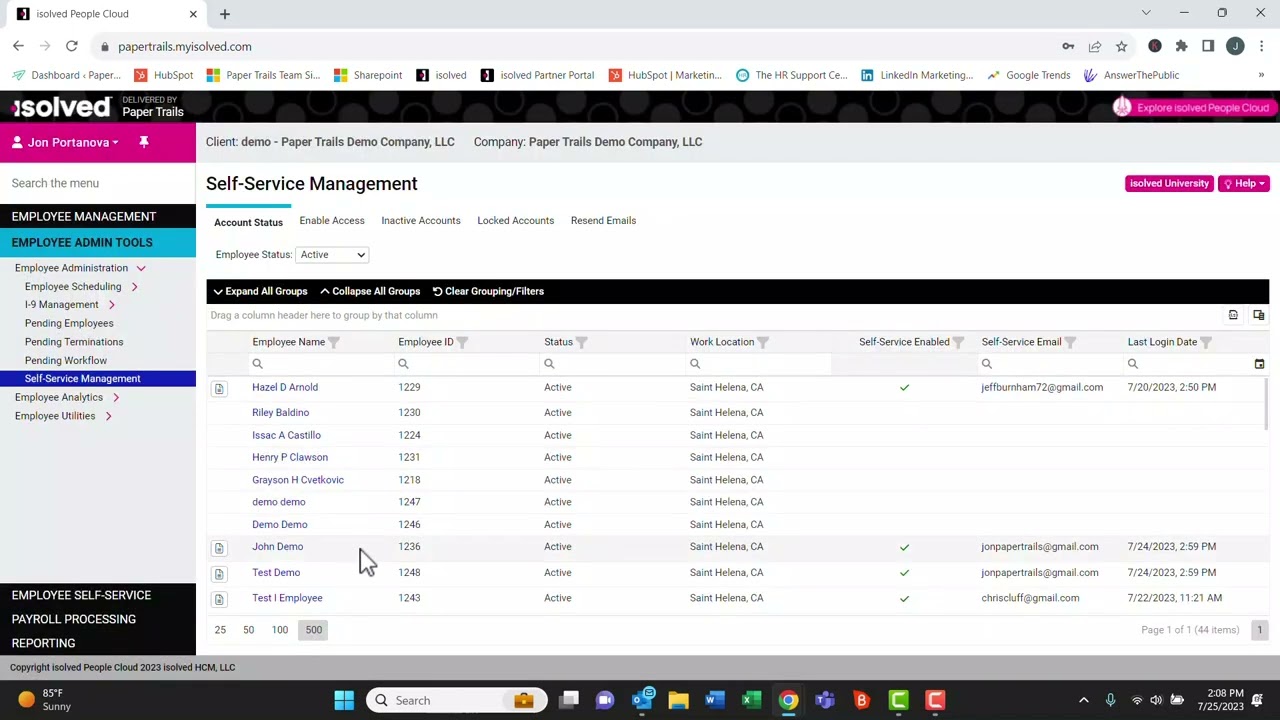
Self-Service Management
As an Admin you have access to manage all emails sent and their status.
- Go to Employee Admin Tools > Employee Administration > Self-Service Management.
- First Tab Account Status – you can see who has registered, who hasn’t and when they last logged in.
- Enable Access – This will show anyone who hasn’t registered and gives you the option to send the authentication email to all or pick individual employees.
- Inactive Accounts – This will show any inactive accounts.
- Locked Accounts – You can unlock any accounts that may be locked.
- Resend Emails – Pick a date range and you can choose the type of email or template that was originally used, and you can resend directly from here.
Step-by-Step Instructions
- Login to papertrails@myisolved.com
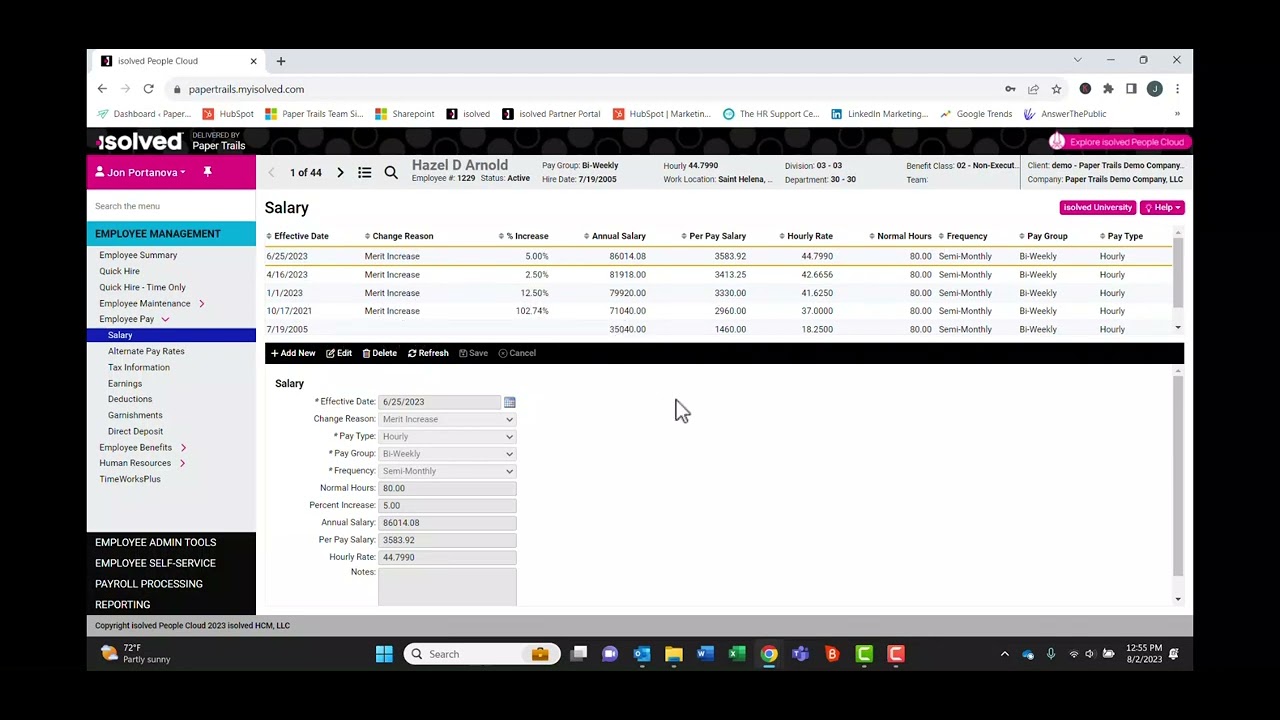
- Go to Employee Management > Employee Pay > Salary
- Choose the Employee from the Employee List
Add New on Black Task Bar. **Always click Add New instead of edit as this will keep a history of all previous changes.
- Effective Date – will auto generate to the first date of the current pay period the employee is within. Therefore, the rate change will take effect with the current pay period to be processed.
- Change Reason – You can choose to enter a change reason there are several to choose from, it is not mandatory to enter.
- Pay Type – Choose the appropriate type for the employee. If they are changing from one to the other, for example Hourly to Salary be sure to change to Salary and not just the rate of pay.
Be sure to use the correct box when entering the new rate
- Annual Salary – Entering the annual salary will auto generate what the Per Pay Salary will be for each payroll and generate what an hourly rate would be.
- Per Pay Salary – This will be the amount paid to the employee each pay period and will auto generate the Annual Salary and what the hourly rate would be.
- Hourly Rate – This is the rate of pay the employee will be paid for each hour worked and will auto generate what the Annual Salary would be if working the Normal Hours per pay period hours. It will also generate the Per Pay Salary if working the Normal Hours per pay period.
- Save on the Black Task Bar
Step-by-Step Instructions
- Login to papertrails@myisolved.com
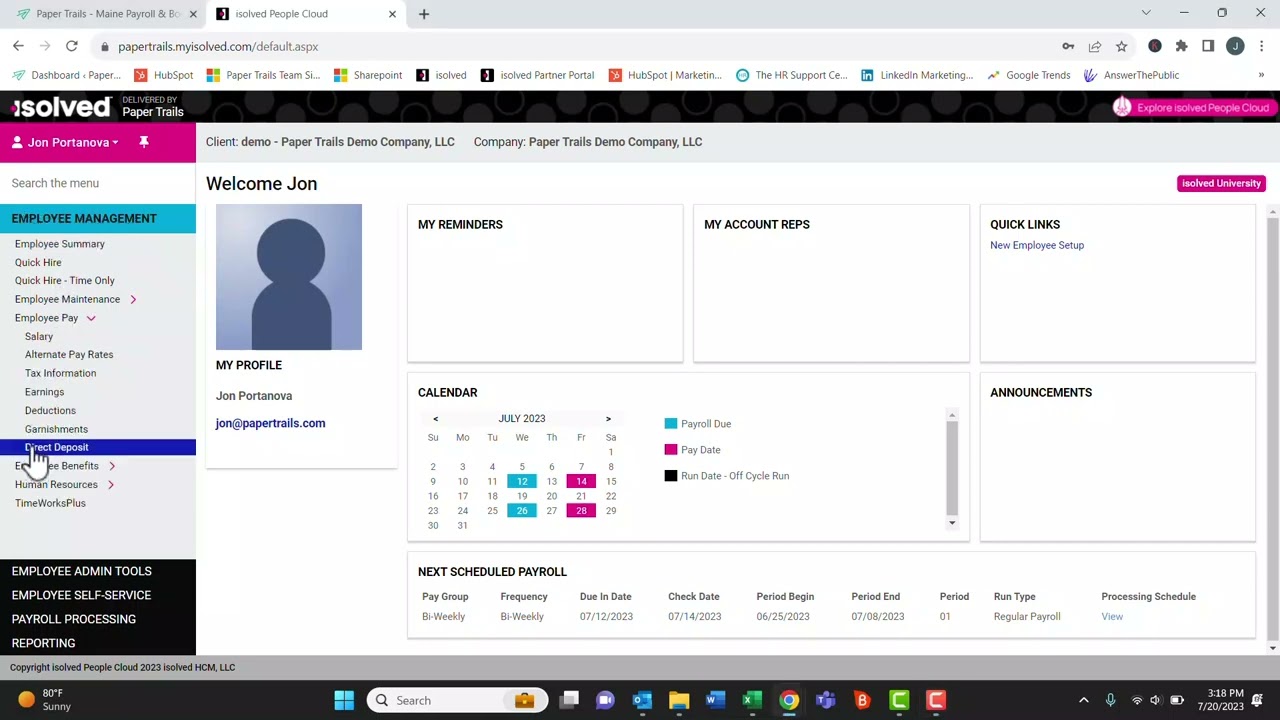
- Go to Employee Management > Employee Pay > Direct Deposit
- Choose the Employee from the Employee List
Adding a New Direct Deposit to an employee who doesn’t have an existing DD
-
- Add New on the Black Task Bar.
- Status – Active.
- Account Type – Choose the appropriate type of bank account.
- Sequence – 100% choose Remaining Net ( you do not need to enter Amount or Percent when 100% is being deposited to one account).
- Routing Number & Account Number – We suggest getting either a voided check or bank note to be certain the information is correct. If the information entered is incorrect the direct deposit will bounce back to Paper Trails, this may take a few days. We are unable to make any corrections to a direct deposit that fails until after the bank notifies us. This can cause a delay of several days before the employee can be paid.
- Description – Enter the Bank Name.
Multiple Direct Deposit Accounts – When an employee has multiple direct deposit accounts enter the Status and Account Type, then if there are 2 or more accounts the Sequence box will need to have a number entered the drop down will generate numbers and remaining net. If there are two accounts only enter 1, enter either the amount or percent that should be deposited into that account and complete that row. Click the Add New Tab under the Status box, enter status, account type, and then for status enter reaming net, continue and Save.
Making a Direct Deposit Inactive – For the DD that is to be made inactive go to the end of the row and click on the Pencil Icon to edit. Status, using the drop down choose inactive and Save.
Step-by-Step Instructions
- Login to papertrails@myisolved.com
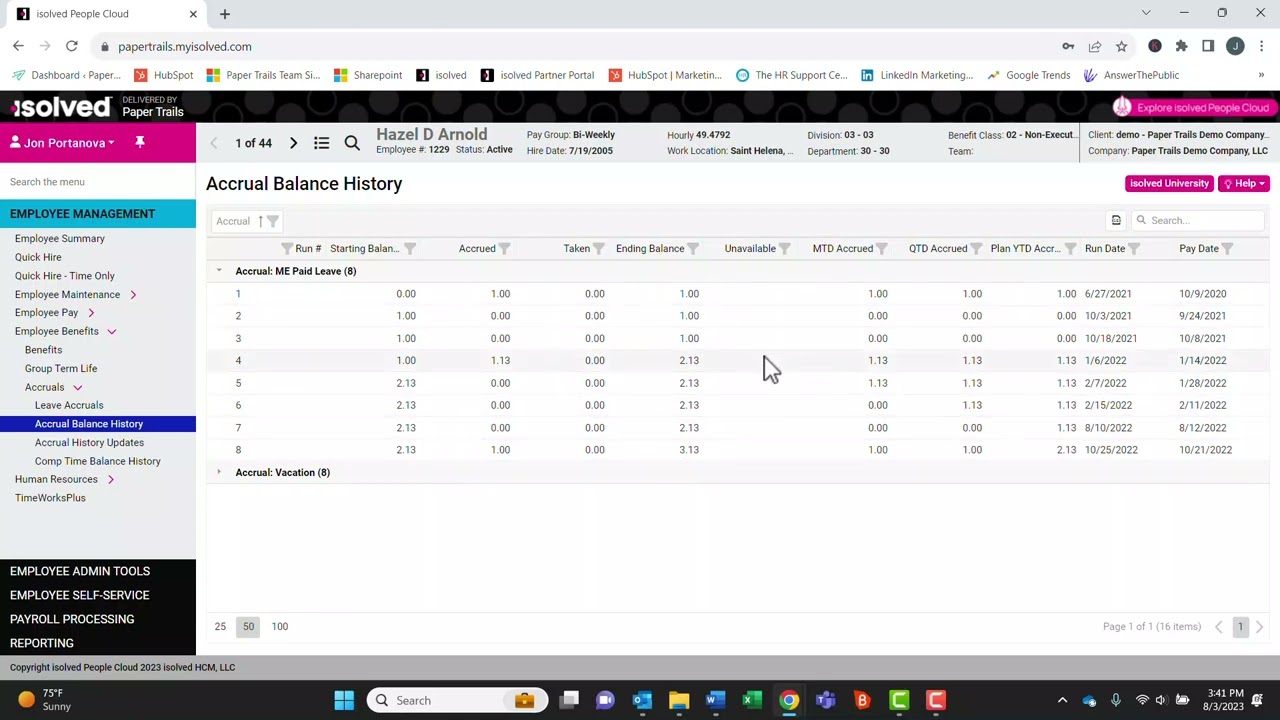
- Go to Employee Management > Employee Benefits > Accruals > Leave Accruals.
- Choose an employee from the employee list.
Here you can view the Accrual Plan the employee is assigned to. The employees available Current Balance. The Plan Values showing the accrual rate, Balance Limit, and the Carryover policy.
Accrual Balance History
- This will show you the employee’s starting balance, what has been accrued, what has been taken, the date each was posted and the ending available balance.
To Assign or Edit an Employee’s Accrual Policy
- Leave Accruals – Select (accrual) Plan, using the drop down choose the appropriate plan that employee. NOTE: only eligible plans for that employee will show in the drop down, if you don’t see a specific plan, it means that employee is not eligible based on your Policies guidelines. You can override the assigned plan using the Employee Overrides on the right side. Change the accrual rate by entering the rate in the override box, Balance Limit and Carryover Limit may be changed as well.
- Click Save on Black Task Bar
To Assign or Edit Accrual Balances
- Accrual History Update – Click on the pencil icon to the right of the page, here you can edit the accrual balance.
- In the Override Value column, Balance Row, enter the updated accrual balance. If you wish to make changes to any of the other fields enter the amounts in the appropriate box.
- Click Save on the Black Task Bar
*** Please note the accrual balances will update with the next payroll processed, after completion of the payroll you can go back to Leave Accruals and see that the Current Balance has been updated with the new accrual amount you entered.
Step-by-Step Instructions
- Visit myhrstuff.com.
- Click the Menu bar in top left (that’s the 3 pink lines).
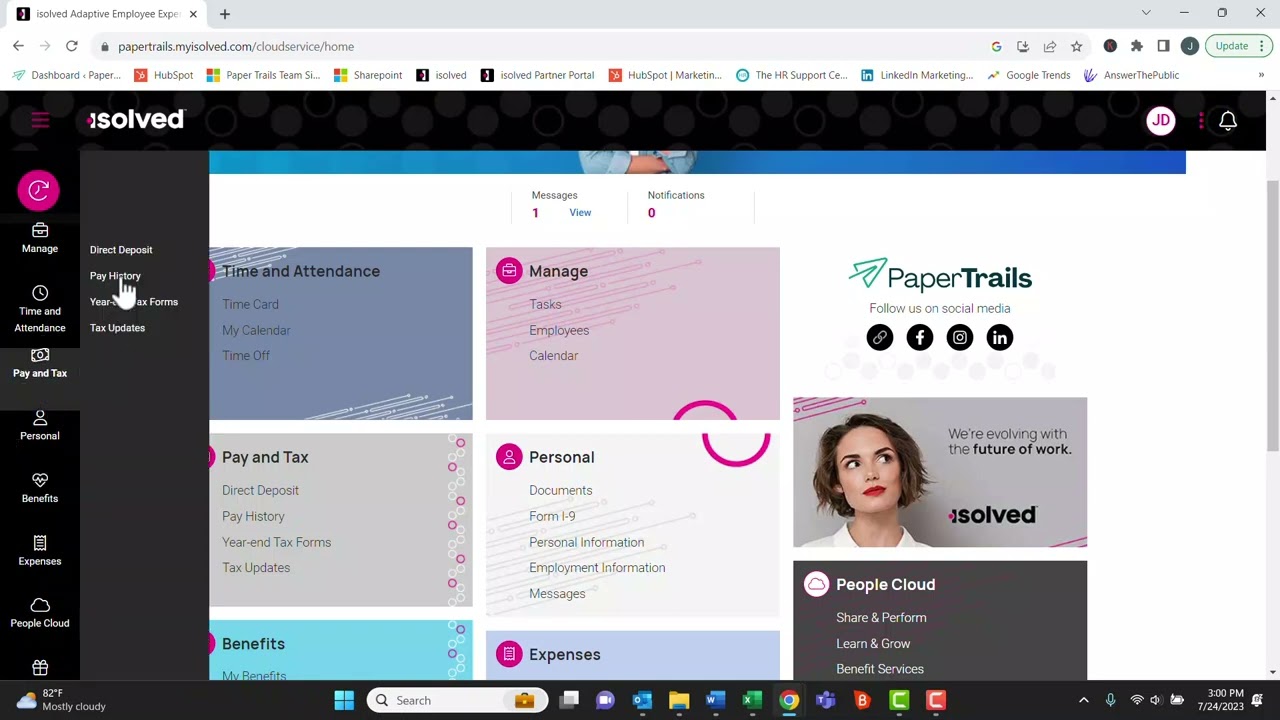
- Under the pay and tax menu, go to pay history.
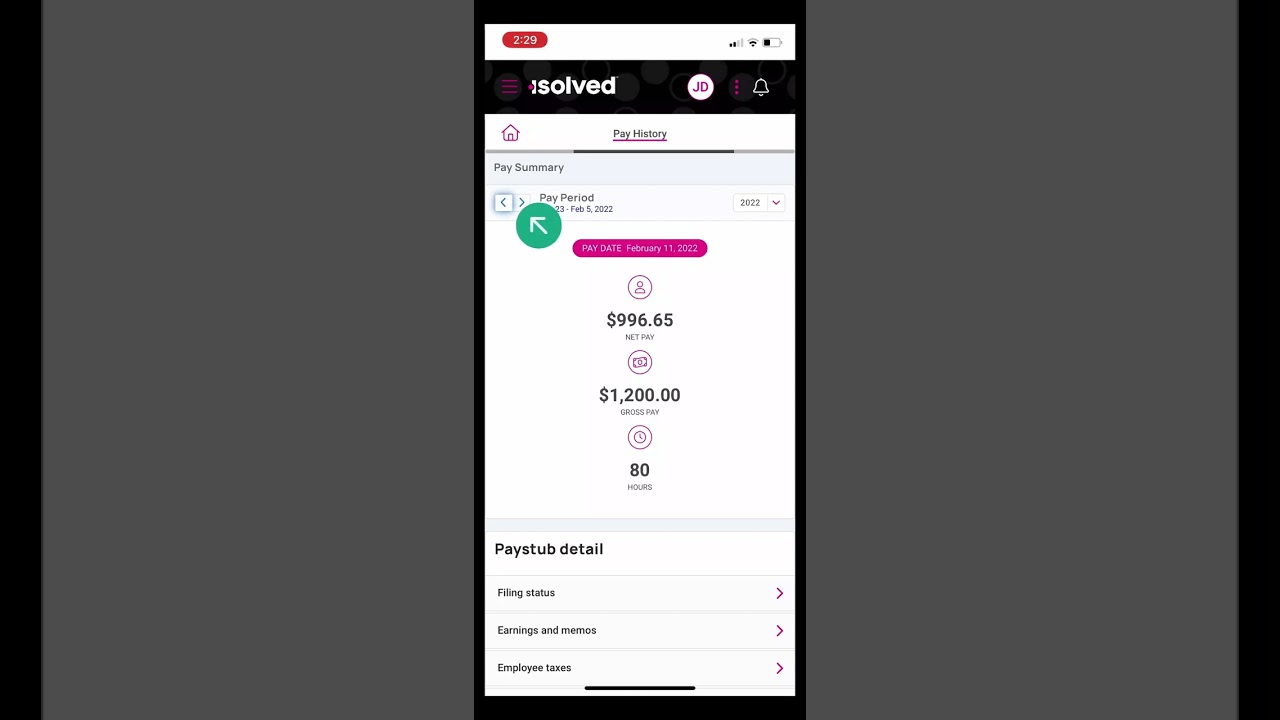
- Click each dropdown to see more information.
- Click download paystub to download a copy.
Step-by-Step Instructions
- Visit myhrstuff.com.
- Click the Menu bar in top left (that’s the 3 pink lines).
- Under the pay and tax menu, go to pay history.
- Click each dropdown to see more information.
- Click download paystub to download a copy.
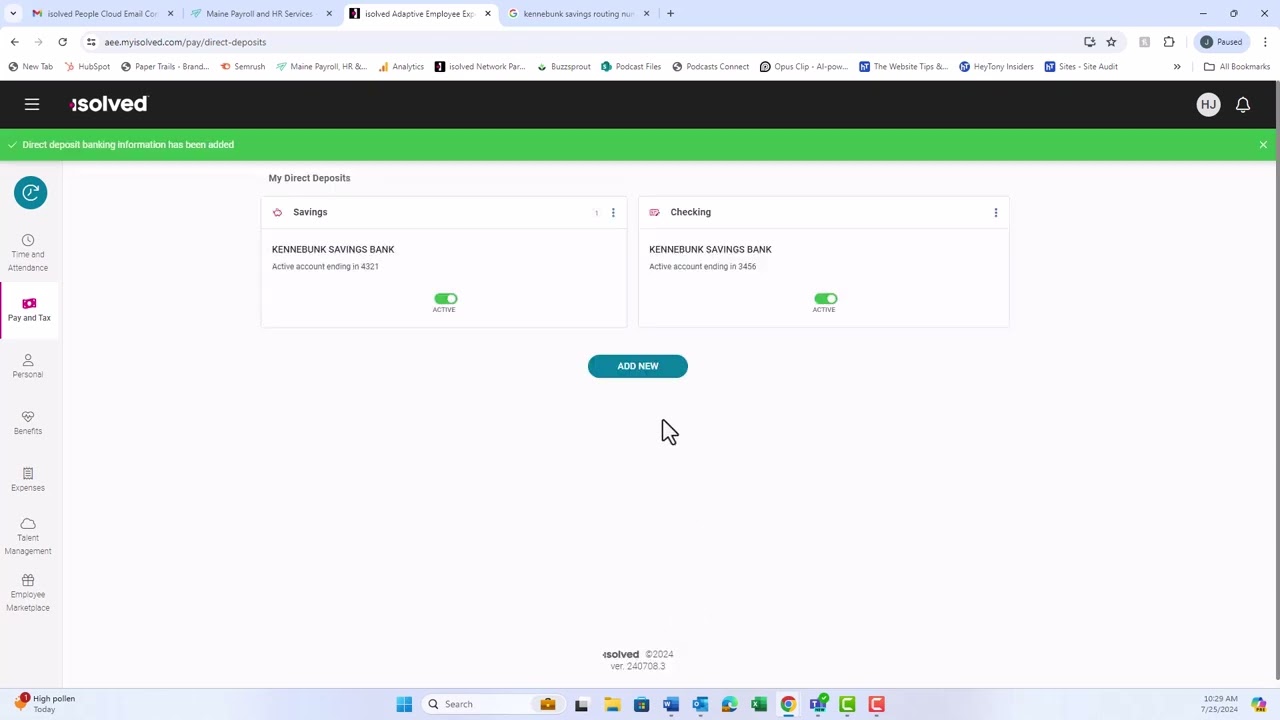
Step-by-Step Instructions
- Visit myhrstuff.com.
- Click “direct deposit” under the pay and tax menu.
- Click the “add new button” to add a new account or the 3 dots in the top right to edit an existing account.
- Enter the routing and account numbers.
- Click “save”.
Below are some additional recommended classes:
A quick course outlining the major features of isolved, and how to navigate through the menus, etc.
Learn how to add new employees and the basics of editing existing employees.
Advanced editing of employee setup, including direct deposit and deductions.
Learn how to process a basic payroll!
Don’t be afraid to review any of the other informative classes. The University is your ticket to success!
Resources For You

We have compiled many resources for you at papertrails.com/resources including:
- isolved Help Videos & Guides
- Updated HR & Payroll Blog
- Frequently Asked Questions
- Upcoming Webinars
- New Hire & Direct Deposit Paperwork
- Past Webinar Recordings
- Labor Law Poster Service
- eBooks, Guides, Infographics
- Small Business Big World Podcast
- Payro Integration
This is the first stop to get the quick resources you need. If something is missing, just reach out, and we’ll get you exactly what you need!
Things You Have Access To

At Paper Trails, we strive to provide you with all of the resources, tools, services, integrations and more that you need to make running your business as smooth as possible.
But, we know that you are busy and things sometimes fall through the cracks. That is why we have a list of some of the items that you may not have known about that you have access to as a client of ours. Things like:
- Turbo Tax Integration
- Earned Wage Access with ZayZoon
- The Work Number by Equifax
- Payro - A Payroll Funding Option
- The Employee Marketplace
- Labor Law Poster Service
- Integration with Employee Navigator
- HR Support Center
HR Consulting Services

We are proud to now offer local, expert-led HR consulting services to augment your business’s HR practices. We have different packages that included different items, or an a la carte option for items above and beyond or outside each package for an hourly fee.
Some HR tasks that we can assist with include:
- Employee handbook
- Employee file and I-9 review
- Job descriptions, offer letters, termination letters
- Unemployment and workers' compensation claims management
- Employee onboarding and offboarding
- Conflict management
- Wage and compensation analysis
- Basic benefits compliance
For more information about our HR Consulting Services, check out this page here.
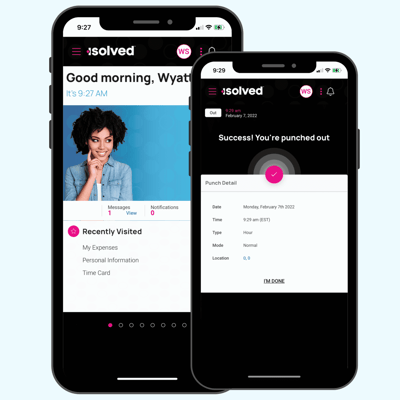
Your employees are automatically setup with online access of their own. Via the isolved People Cloud mobile app or from myisolved.com, your employees can:
- View their entire pay history & year-end W2s
- Review and update tax withholdings and direct deposit
- If in use, punch in/out, review time cards and request time off
- Update personal information, emergency contacts and more
- Enroll and manage benefit plans through open enrollment
How do employees get setup on myhrstuff.com?
When new employees are added, we automatically send them an activation email. To activate their account:
- Click the activation link in the email
- Enter the required “authorization code” which is the last four digits of their social security number
- Setup a strong, 12 character password
- Done!
How do employees add myhrstuff to a mobile device?
How do employees get help using myhrstuff?
We have so many resources for your employees on using and troubleshooting this self-service module. These help video and instructions can be found at papertrails.com/help!
Contact Us

We are here for YOU!
Finally, if there is something you need that you do not see on this page, or you have a question, do not hesitate to contact a member of our team. We can be reached at:
Via phone: 207.721.8575
Via email: payroll@papertrails.com
Support page: papertrails.com/contact
Access one or as many Paper Trails payroll services as you like
Straightforward, accessible HR support for businesses like yours.
Performance reviews, license and certificate tracking, and a comprehensive HR answer center.
We help you find the right people to get on board.
Can’t find what you’re looking for? Contact our local team.
We’ll stay in the weeds to manage your payroll, Human Resources, and compliance needs.
